Return To Main MIRC Menu
MIRC Aliases
Alias Scripts in mIRC are simple and fun. An Alias is an alternate name for something. In the case of alias scripts, an Alias is a command name you create to run one or more commands. Its a bit like a macro in Word or similar.
MIRC Aliases are effectively a way to define shortcut keys to do anything at all that mIRC can do. Complex commands, a series of commands, or long texts that you may often repeat can all be made simpler with mIRC alias scripts.
Example:
Like most people in IRC I am often asked how old I am, where I live, etc.
I used to be typing the same old details several times per night. However,
by defining the command line:
as a single alias command called /myd (a name I made up that is short for 'my details') all I type now in response to questions of age, location, gender or marital status, etc. is /myd .
Think about that for just a second and you'll find all kinds of situations where a simple alias will save you a lot of repetitive typing. It is a very useful tool indeed to define your own commands, and this tutorial will show you how to do it.
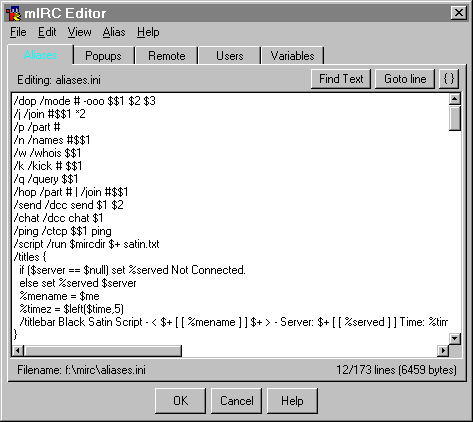
The MIRC Editor
The first thing to do is become acquainted with mIRC's script editor. It's a simple enough thing being similar to windows notepad text editor, but with a few extra functions specific to mIRC script writing.
To open the mIRC editor to write and edit aliases you can select 'Alias' from the 'Tools' menu, or press Alt + A together, or select the alias icon on the toolbar. Whichever method you choose, the mIRC editor window will appear.
On the menubar of the editor are five menus. At first the Help menu may be the most useful. (There is also a help button at the bottom that opens the Help file at the section on aliases). The file menu (as in most applications) is the most important since it includes the 'Save' function.
The 'View' menu is used when you have aliases spanning several documents. The view menu lets you select any loaded script file for editing. When editing aliases the fourth menu is 'Alias' and contains an alphabetical list of all the aliases you have defined.
The Tabs just above the main text window let you switch between types of scripts so that you can easily switch between editting any and all files. Later tutorials will cover the other tabs (Popups, Remotes, etc.). For now its enough to just know what the tabs are.
The area of the tab around the text editing window shows the filename of the current file (probably c:\mirc\aliases.ini). The buttons to 'find text' or 'go to line' help you find specified text or line numbers in long files.
The Format of an Alias
Now that you are familiar with the editor you only need to know how to format the alias entry itself. Even if you have never tried your hand at scripting anything before, you are just moments away from writing your first script.
An alias is entered into the editor in the format:
<alias name> <command to perform with all parameters>e.g.
/myd /me is a 32 year old Englishman, married with three children/myd is the alias name (a new mIRC command) while /me is a ... etc is the command with all parameters that will be performed when ever I use the /myd command. As with most scripting, seperate each command and parameter with a single space.
With scripting you do not need to include the '/' command prefix. The command prefix is only needed for commands given in an editbox. You can include the '/' prefix if you wish, it will work either way.
Writing scripts without including the prefix does have the advantage of allowing your scripts to be used even by those who have changed the default command prefix in the options.
/myd /me is a 32 year old Englishman, married with three childrenworks in exactly the same manner as:
myd me is a 32 year old Englishman, married with three childrenMIRC makes no distinction between scripts with command prefixes and those without.
Multi-command Aliases
MIRC Alias scripts become even more useful when you combine multiple commands into a single alias. There are two ways of doing this. Firstly you can seperate commands with two spaces then the | character and then one more space. The | character is a shifted \ back-slash.
Example:
/enter /me walks into # | /say Hello Everyone!The alias has been given the name /enter. /enter is now defined as if it were a mIRC command. The first command is /me walks into # which sends an action message. The # is an identifier of sorts. mIRC will replace # with the current channel name.
The | command seperator tells mIRC that a second command follows. The second command is /say Hello Everyone!. The /say command is like just entering text into the edit box. Say will just send the text into the active window.
The /say command is much like /msg <channel OR nick> but has a few differences. The /say command works fine in popups and alias scripts since it gets its destination from being called within a window. In scripts not called by typing or popup menus in a specific window, you would need to use /msg $chan or similar instead.
The Second method to creating multiple command aliases (or other scripts) is to use the { } brackets. Where you would normally enter the first command, instead enter a { then on a new line enter the first command. add a new line for each extra command. After the last command, on a new line, enter }
Example:
enter {me walks into #
say Hello Everyone!
}
The { } brackets method can be a lot neater and tidier. Certainly if using long commands or more than two commands I would recommend usint the brackets rather than the line seperator.
Alias Examples
/site /say To learn all about mIRC go to https://dooyoo-uk.tripod.com/mirc/This creates an alias called '/site', which sends the text "To learn all about mIRC go to https://dooyoo-uk.tripod.com/mirc/" into the active channel or chat window.
In the mIRC identifiers tutorial you were shown the $1 and the $? identifiers. These can be used to good effect in alias scripts. Especially when also combined with the text controls for coloured text messages.
When using $1 in an alias, $1 will be a parameter you'll need to add after the alias command.
In the following examples, ctrl k means Ctrl + k together, ctrl o means Ctrl + o together, ctrl b means Ctrl + B together, etc. Refer back to the MIRC Text Controls page if you wish.
Example 1:
/hiya /say ctrl b ctrl k12,12 . ctrl k8,8 . ctrl k4,4 . ctrl k12,8 Hiya ctrl k4 $$1 ctrl k12 Hiya ctrl k4,4 . ctrl k8,8 . ctrl k12,12 . Do not use any spaces between the Ctrl codes or numbers
or commas or dots. Do include a space before and after any identifier
e.g. $$1 . The control codes will create a coloured greeting. All you
need type to use this alias is:
/hiya <nick>
As well as the control codes, you'll probably notice that the identifier $$1 was used, rather than $1. $1 and $$1 are almost identical but $1 looks for a parameter for $1 and will leave a blank if one isn't found. $$1 will insist on a parameter, and will stop the command from being performed if no $$1 parameter can be found.
In other words, if you forgot to add a nick after the /hiya command then $$1 cannot be filled. Therefore the whole greeting is cancelled. If $1 had been used instead and you forgot to give a nick the greeting would just say Hiya Hiya.
Example 2:
/hello /say ctrl b ctrl k12,12 . ctrl k8,8 . ctrl k4,4 . ctrl k 12,8 Hello ctrl k 4 $$?="Who do you want to say hi to?" ctrl k 12 Hello ctrl k 4,4 . ctrl k 8,8 . ctrl k 12,12 .Do not use any spaces between the Ctrl codes or numbers or commas or dots. Do include a space before and after any identifier e.g. $$?="Who do you want to say hi to?" . This alias is nearly identical to Example 1 but the $$? identifier has been used instead of $$1.
To use this alias just type: /hello. The $$? will make mIRC ask you for the required parameter in a dialog box. You just type a name into the dialog box and hit enter or click the OK button.
MIRC Workshop Exclusive
MIRC Workshop proudly presents Black Knight's mIRC script writing Java Applet. This applet lets you quickly and easily generate lines of code for mIRC scripts. The Script Writer applet is especially suited to writing Remote Scripts including aliases, popups and events.
Simply use the menu driven generator to create multiple lines of code including colours, bold and underline codes, a wide range of preset identifiers, commands, events and anything else at all with 'own input' and edit capabilities.
A few simple clicks and any additional custom input you like and your code is ready to cut and paste into your mIRC scripts. Best of all, using this applet is totally FREE!
The mIRC Script Writing applet is a MIRC Workshop exclusive. No other site offers you such a great and easy way to generate your scripts and popups.
Return To Main MIRC Menu
Back / Index / Next
Copyright ©2001 MIRC
Workshop
All rights reserved
Search engine optimisation positioning tutorials| Internet Marketing Consultant